
Sacred Texts Taoism Index Previous Next
Kung-Fu, or Tauist Medical Gymnastics, by John Dudgeon, [1895], at sacred-texts.com
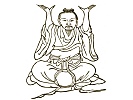
The Level Frame. (#).—There are four "horse-riding" (#) forms under this position.
1.—Standing evenly and uprightly, separate the feet the width of the shoulders apart and keep the palms upward on the same level as the loins. Do not lean against anything.
2.—Turn the palms downwards, always on the same level as the loins.
3.—Rub evenly from the sides and make a circle as if rubbing the head.
4.—Then stretch the arms straight forward and erect the hands with the palms directed forward and fingers upwards on the same level as the nipple; take one breath, and wait a little, about the time of three respirations. Afterwards, after taking a breath, the eyes should be directed to the right, left, above and below, the time of three respirations being taken as the unit.
There are also two "looking-moon" (#), forms under this position.
1.—Let the left foot take a step horizontally to the side, bend the left knee, incline the left foot; keep both the right leg and foot straight. Lay the left hand on the upper aspect of the thigh, with the thumb directed backwards and wind the right hand round the back of the right ear and with the five fingers in a form as if holding a thing, the points of the fingers directed backwards like the claws of a vulture.
2.—Afterwards, raise the left hand up to the level of the eye, the fingers clenched so that the thumb shall be opposite the little finger, the second one, the fourth and the middle one projecting a little. Keep the palm—the heart of the hand—hollow, sufficient to contain the lid of a tea cup. First look at the height of the left hand, then turn the head even and take a breath. Again turn the head and look at the part between the thumb and forefinger. Repeat this on the right side; three times on each side, swallowing six mouthfuls of air.
There are two "expanding-breath" (#), forms tinder this position.
1.—The first resembles the first "horse-riding" form, except that the palms are even.
2.—The second resembles the last "horse-riding" form, except that the hands are turned and pushed to the front like the last of the "horse-riding" forms and no breath is taken.
Preliminary Military Exercises.—(#), There are three forms under this position and seven diagrams.
1.—The left foot bent, the right foot straight, the remainder the same as the first "looking-moon" position and in addition with the face straight take a breath and turn the head to the left.
2.—Stretch out the left hand which was formerly laid on the leg straight to the left and keep the palm downwards.
3.—Turn the left hand back to the level of the breast and then stretch it out again and bring it back, repeating it two times.
4.—Turn over the hand on the breast with the thumb upwards and the other fingers downwards and the palm opposite the breast and take a breath.
5.—Turn the hand with the thumb downwards and the middle finger upwards and turn the head to the left.
6.—Stretch out the hand opposite to the breast and wind it round the ear, keep the palm directed upwards and extend it to the left.
7.—Turn it back from behind the ear and clench the fist in front of the breast, keep the outer part of the fist directed upwards, take a breath and then turn the head to the left. To be done on the right also, each side three times, altogether taking eighteen breaths.
The "Circulating or Inspecting-Hand" Position (#).
Standing erect, keep the feet 15 or 16 inches apart; the elbows extended evenly forwards, the wrists straight and perpendicular opposite each other and the fingers separated.
The "Jade Girdle" Position (#).
Separate the palms. pressing them down behind the ears to the loins on the level of the navel; keep the tips of the fingers apart and corresponding to each other, and distant from the body three inches interlocking, as it were, the loins and take a breath.
The "Suspending-Loin" Position (#).
Apply the fists to the loins, turn the backs of the hands downward and full in front take a breath.
The "Holding-Up Robe" Position (#).
Open the fists, turn them from the underpart of the ribs, pronate the palms and stretch them forward evenly as if lifting something and full in front take a breath.
The "Turban" Position (#).
Separate the hands, turn them out from under the ribs to above the head to a distance of 7 or 8 inches between them and the head, direct the palms outwards, the fingers separated opposite each other with the thumb downwards on a level with the eyes.
The "Brushing-Face" Position (#).
There are two forms under this position.
1.—Keep the palms of the hands close together in front on a level with the chin, the two little fingers and elbows applied close together and raise them together over the forehead.
2.—Gradually bend the fingers in order to make hooks of them and then slowly clench the fists and place them under the chin; open them (the fists) again, bring the thumbs together, extend the hands and pass them over the forehead; also keep the two little fingers together and finally make the hands into fists and place them again under the chin. The wrists and elbows should be close together.
"Court Tablet" Position (#).
Pull the fists apart on a level with the shoulders, in a circular form as if enfolding things, the back of the hand directed upwards and the fists opposite each other, and apart 18 or 19 inches, and in front take a breath.
"Side-lifting" Position (#), There are three forms under this position.
1.—Standing aslant, the left foot bent, the right foot erect, interlock the hands and raise them with energy over the head.
2.—Bend the body gradually as if making a bow, as far as the instep of the foot, turn the palms and press downwards, afterwards interlock them again and raise them to the space between the knee and the chin, then all at once make a whirl, and straighten the body and loins.
3.—Separate the hands and let them circle round the ears, then clench the fists and bend the arms in a circular form; the two fists apart opposite each other 18 or 19 inches and the back of the hands kept upwards, take a breath. It is done in the same way on the right; thrice on each side, taking altogether six breaths.
"Front-lifting Position (#). There are three forms under this position.
1.—Standing erect, the feet 15 or 16 inches apart, interlock the hands and raise them over the head.
2.—Gradually bend the body as in the 2nd form of the "Side-lifting" position to the level of the loins. This is done in front, which is the only difference.
3.—This form is also the same as the 3rd of the "Side-lifting" position, except that it is performed thrice in front and one breath is taken each time.
The Position of "Hsueh-Kung Standing" (#). Ten forms are given under this position.
1.—Open the fists, keep the fingers straight, then wind them round the ears and stop at a level with the breasts.
2.—Press downwards from the breasts to the navel without stopping until the navel is reached.
3.—Turn out the hands from the under part of the ribs, keep the palms directed upwards on a level with the shoulders, each hand even 4 or 5 inches apart from the head; the two thumbs in front of the shoulders, the other fingers extended behind the shoulders.
4.—Close the hands together even with the underpart of the chin; the two little fingers close together with the p elms upwards and the wrists and elbows close together. For the first time pronate the palms, let the two little fingers be attached and stretch them upwards.
5.—And then raise them thus over the forehead.
6.—Gradually bend the fingers into the form of a hook, and form them into fists level with the chin.
7.—Open the fists, the palms upwards and the thumbs close together. For the second time pronate the palms the thumbs close together and stretch them upwards.
8.—Raise the hands over the forehead, bring the two little fingers close together, afterwards bring them down to the level of the chin, clench them into fists, then open them as before, bring the two little fingers close together and the palms directed upward over the forehead.
9.—This form is exactly related to the last. For the 3rd time, pronate the palms, the two little fingers close together and stretch them upwards.
10.—Then lower the fingers, form them into fists, let them be evenly arranged and circularly as if enfolding things; the two fists 18 or 19 inches apart. One breath is then taken. This is to be performed three times, so three breaths should be taken.
The "Arranging-Elbow" Position (#). There are three forms under this position.
1.—The left foot bent, the right foot straight, the right hand clenched and held in the left hand.
2.—Stretch out the left elbow to the left and draw it back immediately, then squat with the body, the left foot straight, the other bent; let the left hand still hold the right fist and raise the right elbow a little.
3.—Raise the body, with the left foot bent and the right foot straight; lean the body to the left, take a breath; raise the right elbow higher. Perform the same on the right side; on each side three limes taking six inspirations. While the body is leaning, let the eyes look at a point six inches from the feet.
The "Resting-on-the knee" Position. (#).
The left foot bent, the right foot straight, law the right hand on the left leg over two inches from the knee with the left hand laid on the top of the right hand. Pronate the body sideways, let the face look evenly towards the left and take a breath. With the back bowed, the neck straight, look downwards at a point more than six inches from the feet. Do the same on the right, three times on each side and take six breaths.
The "Chan-hsiao" Position (#). Four forms are given under this position; the first two are termed the "cannon of the den;" the third the "cannon rushing against the sky" and the fourth the "cannon passing through the heart."
1.—The left foot bent, the right foot straight; let the palm of the left hand face downwards level with the breast, the thumb kept inwards; and the palm of the right hand directed upwards and level with the navel; place the little finger inwards and keep all the fingers apart.
2.—Pull the hands out horizontally, then clench them, let the left one be level with the breast eight or nine inches apart, the thumb kept inwards and the right fist level with the ribs over one inch apart; the thumb directed outwards, take a breath in front, then turn the head and look to the left.
3.—Open the left fist and whirl it, then make it into a fist again, stretch it perpendicularly on a level with the side of the forehead. Take a breath in font, turn the head and look at the space between the thumb and second finger of the left hand.
4.—Open the left fist and whirl it round the ear, then stretch the fist straight out towards the left, keeping the dorsum upwards. Turn the head and look to the left, and take one breath. Do the same on the right side, on each side three times, taking altogether eighteen breaths.
The "Grain-Bag-Beating" Position (#). There are 12 forms under this position. The first two are termed "cannon rushing against the sky" (#).
1.—The left foot bent, the right foot straight; hold the bag in the right hand, whirl the left from under the ribs, clench the fist, bend the elbow and extend it upwards, then take a breath.
2.—Hold the bag with the right hand, with it beat the left arm steadily down to the left palm and fingers several times. This is beating the inner part of the left arm.
Rule.—Always beat straight down—never backwards—nor return on any omitted part. It should be done at once.
3.—This is termed "cannon passing through the heart." (#). Open the left fist, whirl it round the ear, stretch the fist straight out to the left, keeping the dorsum upwards and take a breath. Holding the bag with the right hand, with it beat the arm steadily to the back of the hand and the tip of the middle finger. This is beating the outer part of the left arm.
4.—This is termed the "vulture-hand" (#). Whirl the left hand round and take the form of a "vulture-hand," take a breath, then hold the bag with the right hand and with it beat from the left armpit steadily down to the side of the little finger. This is beating the under part of the left upper limb.
5.—This is termed the "minor cannon rushing against the sky" (#). Whirl the left hand once, then raise the fist so as to assume the form of a "cannon rushing against the sky" only a little lower, and take a breath. Now the right hand beats with the bag from the left shoulder steadily down to the side of the thumb of the left hand. This is beating the upper part of the left upper limb.
6.—This and the following are both termed "carrying the tripod on the shoulder" (#). Whirl the left hand from under the ribs, clench the fist, stretch it straight upwards with energy, keeping the thumbs at the back part, then take a breath and look upward at the rising fist.
7.—Holding the bag with the right hand, beat with it from the left ribs steadily down to the front side of the left leg, knee, shinbone, instep of foot and toe. This is called beating the front part of the lower left limb.
8.—This is termed "coiling the elbow" (#). Open the left fist and whirl it round the ear, then bend the elbow and clench the fist on a level with the breast, take a breath and raise the elbow a little. Now with the bag in the right hand beat steadily from the left armpit inclined to the left loin and to the outer ankle and the side of the little toe. This is beating the outer part of the lower left limb.
9.—This is termed the "vulture hand." Open the left fist make a "vulture hand," and whirl it round the ear and take a breath. Then holding the bag by the right hand beat from the end of the sternum down to the abdomen and from the space between the ribs and abdomen beat horizontally to the right side of abdomen; change hands with the bag and beat horizontally to the left of the abdomen. Protect the secret parts by covering them with the right hand and beat with the left hand beginning from the left side of the "little abdomen" steadily to the inner part of the left leg and left toe. If there be abdominal illness of any kind, it may be cured by beating several times. This is beating the inner part of the lower left limb.
10.—This and the next two are called "resting-on-the-knee." The right foot bent, left foot straight, the left hand holding the bag press on the right in the middle of the leg, also the right hand pressing on the bag, then take a breath.
11.—Holding the bag with both hands, raise it over the head and beat the spine twenty times but do not beat the ridge of the spine.
12.—With the left foot stretched, the right foot bent, lay the right hand on. the surface of the right leg; keep the thumb directed backwards, incline the body backwards and look on the left knee. The left hand holding the bag turn the hand back and beat the left part under the back consecutively to the loin, then return the hand and beat the left buttock, left leg, knee, calf down to the heel. This is beating the back part of the lower left limb. After having gone through the exercises on the left upper and lower limbs then transfer to the right upper and lower limbs, following the same method.
The Position of "Scooping The Moon at the Bottom of the Sea" (#) has five forms.
1.—Lay the left hand on the surface of the leg and make the right into a "vulture hand" i.e. bringing the tips of the fingers together.
2.—Whirl the left hand round the ear and then stretch the pains out towards the left.
3.—Turn the hand with the back upwards.
4.—In such a way as to scoop the moon by bowing the head and bending the loins to scoop from left to right; then raise the body up.
5.—While scooping, assume "the looking-moon" manner and take a breath, then look at the interval between the thumb and the second finger of the left hand. The same should be done on the right, thrice on each side and altogether six breaths taken.
The above 64 diagrams are the first part of the exercises; embracing in all 87 breaths.